Google Photos is a popular choice for backing up photos and videos, offering 15 GB of free cloud storage per Gmail account. While uploading media is straightforward, downloading all your content at once can be challenging for some users. Whether you want a local backup or plan to migrate your data to another cloud service, this guide provides an easy step-by-step method How to Download All Data from Google Photos.
Table of Contents
How to Download All Data from Google Photos?
Backing up your Google Photos data is a crucial step to ensure your memories are safe and accessible even offline. If you want to download all your photos and videos at once, the process is straightforward but involves a few key steps. Here’s a detailed guide to help you through it.
Step 1: Visit Google Takeout
Google Takeout is the official service from Google that allows users to export their data from various Google services. To get started:
- Open your web browser and go to takeout.google.com.
- Log in with the Google account linked to your Google Photos.
Takeout will display a list of all Google services connected to your account.
Step 2: Select Google Photos
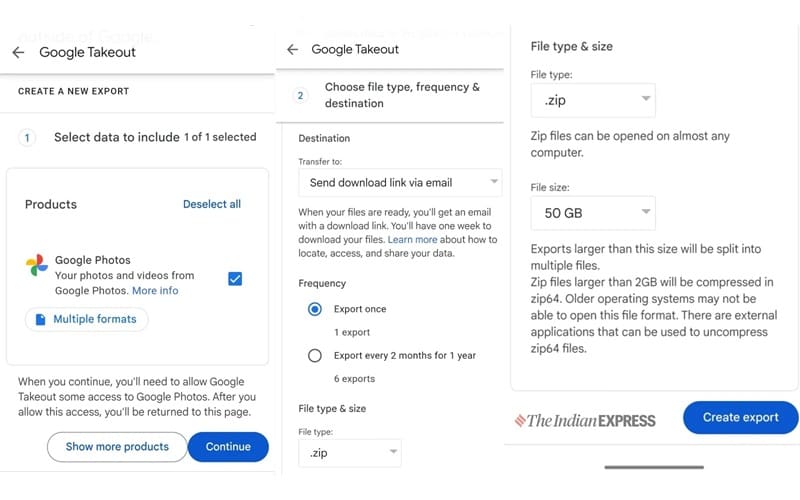
- From the list of services, locate Google Photos and tick the box next to it.
- Click on the All photo albums included option to specify which albums to download. By default, all albums are selected. You can deselect ones you don’t need or select specific albums for export.

This step is especially useful if you want to export only certain events, trips, or timeframes instead of your entire library.
Step 3: Configure Export Settings
Once you’ve selected your data, click on Next Step at the bottom of the page. Here, you’ll need to configure how the exported data will be delivered and its format:
- Delivery Method: Choose Send download link via email. Other options include adding the data directly to Google Drive, Dropbox, OneDrive, or Box.
- File Type: Select ZIP for broader compatibility across devices.
- File Size: Choose a size that fits your internet bandwidth and storage capacity:
- 10 GB or 50 GB for users with high-speed internet and ample storage.
- 1 GB or 2 GB for those with limited internet speed or storage. Smaller sizes will split the export into multiple files.
Step 4: Create the Export
Click on Create Export to initiate the process. Google Takeout will begin preparing your data, which may take several hours or even days, depending on the size of your library. You’ll receive an email notification once the export is ready for download.
Step 5: Download Your Data
After receiving the email, follow these steps:
- Open the email and click on the Download your files link.
- Log in to your Google account for verification.
- Once verified, your browser will start downloading the ZIP files.
This method ensures a secure and organized way to export your data, giving you full control over your digital library. Whether you’re switching cloud storage providers or just want a local backup, these steps will guide you through the process effortlessly.


